
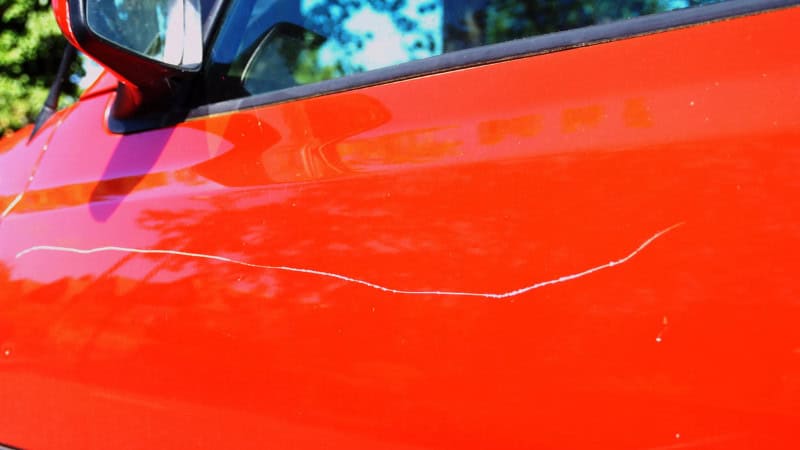
Nothing’s more frustrating for a car owner than spotting a new scratch on their ride. Whether it’s from a car wash brush, a stray shopping cart at Walmart, or a runaway tree branch, that mark in your paint always grabs your attention. Here’s the good news—most car scratches can be fixed at home, using simple tools and mechanic-approved methods. As a real mechanic in the USA, I’ll show you how to save money and get pro-level results, step by step.
This guide details the steps I use in the shop to remove car scratches—from light swirl marks to deep gouges. You’ll learn to assess scratch depth, choose effective tools, and restore your car’s finish without causing more damage. Whether you want a quick fix or a show-ready finish, you’ll find what you need here.
Types of Car Scratches
Not all scratches are equal—the right fix depends on depth. Your car’s paint has three layers: clear coat, base coat (color), and primer. Identifying the scratched layer is key to choosing the correct repair and achieving professional results.
1. Clear Coat Scratches
Clear coat scratches are the most common—and easiest—to fix. They only affect the top layer of paint and look like light swirl marks or spiderweb lines. If you run your fingernail over the scratch and it doesn’t catch, it’s likely just in the clear coat. Grab a good scratch remover or polishing compound (like Meguiar’s or 3M), and you can usually make these disappear in your own driveway.
2. Paint (Base Coat) Scratches
These are deeper and cut into the color layer. You might see a darker line or a change in color where the scratch is. These require more work—usually polishing plus possible wet sanding—to level the scratch and restore the shine.
3. Primer/Metal Scratches
These are the deepest scratches, exposing the gray primer or even bare metal beneath the paint. If you see white, gray, or silver showing through, the scratch has gone past the paint layer. These can’t be fixed with compounds alone—they need touch-up paint, clear coat, and sometimes light sanding and polishing to blend everything back in.
Identifying the type of scratch correctly will save you time, money, and frustration.
Tools & Products You’ll Need
Before you start removing scratches, gather everything you need in one place. Different scratch depths require different tools, but here’s a complete mechanic-approved list so you’re ready for any situation:


- Microfiber towels (soft, lint-free)
- Automotive soap & water
- Scratch remover or rubbing compound
- Polishing compound
- Dual-action (DA) polisher — optional, but gives professional results.
- Applicator pads (foam or microfiber)
- Car wax or paint sealant
- 1500–3000 grit sandpaper (for wet sanding deeper scratches)
- Spray bottle with soapy water (for lubrication when sanding)
- Masking tape (to protect nearby paint)
- Touch-up paint
- Clear coat
- Plastic razor blade (optional for leveling touch-up paint)
The right tools make scratch removal smoother, safer, and more effective—just like in a real shop.
How to Identify Scratch Depth
Before removing a scratch, determine its depth. This tells you if a scratch remover, sanding, touch-up paint, or professional help is needed.
The easiest way is the fingernail test: lightly drag your nail over the scratch.
- If your nail doesn’t catch, it’s a clear-coat scratch—easy to fix with polish or compound.
- If your nail catches slightly, the scratch has reached the base coat, and you’ll need a more aggressive approach, like wet sanding or deeper polishing.
- If your nail catches hard or you see gray primer or bare metal, the scratch is deep and requires touch-up paint and clear coat.
Lighting helps. Use sunlight or a bright flashlight to view the scratch from different angles. Clear-coat scratches appear white and shallow; deeper ones look darker or show a different color beneath.
Correctly identifying the depth saves time and prevents you from removing too much clear coat during repair.
Method 1: Remove Light Clear-Coat Scratches
Light scratches that sit only on the clear coat are the easiest to fix and usually respond well to a good scratch remover or rubbing compound. This method works for swirl marks, light car wash scratches, and small surface lines.
Wash & Dry the Area
Wash the scratched area with automotive soap and water. Dirt left on the paint can cause further scratches while polishing. Dry with a clean microfiber towel.
Apply Scratch Remover or Rubbing Compound
Put a small amount of scratch remover or rubbing compound on a microfiber or foam applicator. Work into the scratch using small circular or straight motions. Apply moderate pressure—enough to work in the product, but not so much that you risk removing too much clear coat.
A dual-action polisher can also be used for better results, but hand application works well for light scratches.
Buff & Inspect the Area
After 20–30 seconds of polishing, wipe clean with a microfiber towel and inspect under good lighting. If the scratch remains, repeat 1–2 times. Light scratches usually disappear after a few passes.
Apply Wax to Protect the Paint
Once the scratch is gone, apply car wax or paint sealant to the area. This restores shine and protects the clear coat from UV rays, dirt, and future scratches.
This method handles most surface damage. If the scratch remains after a few attempts, it’s likely deeper and needs sanding or touch-up paint.
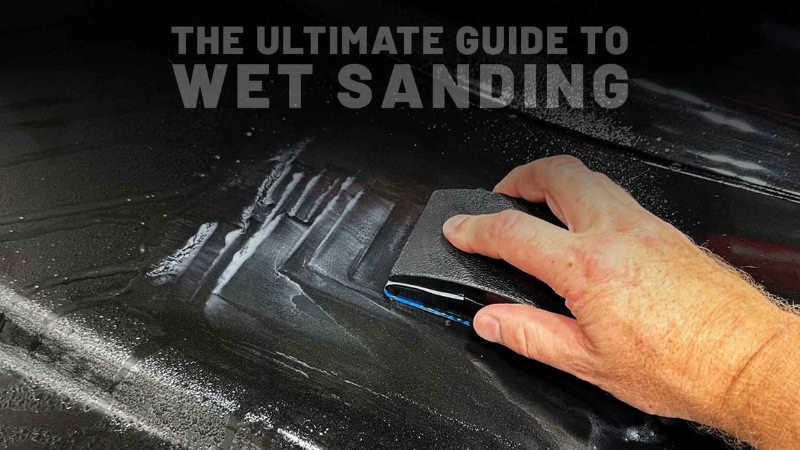
Method 2: Remove Moderate Scratches With Wet Sanding
Wet sanding is the next level up when the scratch remover isn’t strong enough. This method is for moderate scratches that reach slightly into the paint but haven’t exposed primer or metal. Done correctly, wet sanding levels the clear coat and smooths out the scratch so it disappears after polishing.
When Wet Sanding Is Appropriate
Use wet sanding only when your fingernail catches the scratch, but you do not see primer or metal. If the scratch is too deep, sanding won’t help and can make the paint too thin.
Prepare the Surface With Soapy Water
Mix a few drops of car soap into a spray bottle of water. Spray the scratched area generously. This keeps the sanding surface lubricated so you don’t burn through the paint.
Sand Gently Using 2000–3000 Grit Paper
Wrap 2000–3000 grit sandpaper around a small sanding block or hold it with your fingers. Sand the scratch lightly in back-and-forth motions, keeping the surface wet the entire time.
Use minimal pressure—let the sandpaper do the work. Stop every few seconds to check your progress. The goal is to level the scratch, not thin the clear coat too much.
Mechanic tip: Avoid sanding edges or body lines. These areas have thinner paint, which burns through easily.
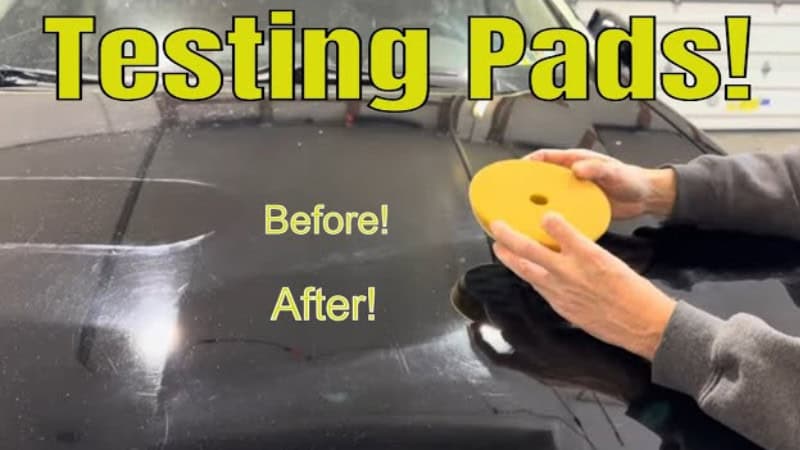
Polish to Restore Shine
Once the scratch is leveled, the area will look dull—that’s normal. Apply polishing compound using a microfiber pad or dual-action polisher. Work the polish until the shine returns. This removes sanding marks and blends the repair into the surrounding paint.
Seal With Wax or Ceramic Coating
Finish by applying a layer of wax or paint sealant. This protects the freshly restored clear coat and helps prevent future scratches.
Wet sanding gives professional-level results when done correctly. Just be patient, use plenty of lubrication, and check your work often to avoid damaging the paint.
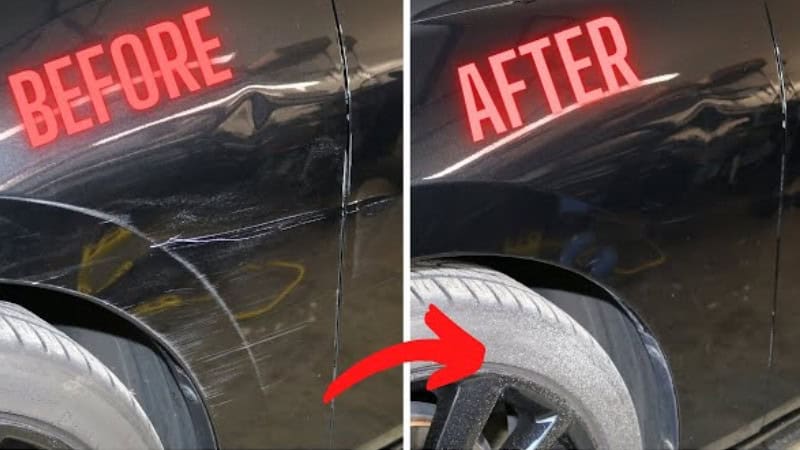
Method 3: Repair Deep Scratches Reaching Primer/Metal
Deep scratches are the toughest to fix because they cut through the clear coat and color layer, exposing the primer or even bare metal underneath. When you see gray, white, or shiny metal inside the scratch, polishing alone won’t fix it—you need touch-up paint and clear coat.
Clean & Mask the Area
Begin by washing the damaged spot thoroughly to remove dirt, wax, or loose paint. Dry with a microfiber towel. Use masking tape to protect the surrounding area, keeping the repair clean and controlled.
Apply Touch-Up Paint
Most cars use basecoat/clearcoat paint systems. Use OEM touch-up paint that matches your paint code exactly.
- Shake well
- Apply paint with a fine brush or pen
- Fill the scratch slowly and evenly
Apply thin coats and allow each one to dry fully. The goal is to restore the paint level to match the surrounding surface.
Let It Cure, Then Add Clear Coat
Once the color layer is dry, add a thin layer of clear coat. This seals the paint and restores protection. Clear coat should also be applied in thin layers—too much creates a raised blob that’s harder to blend later.
Sand Lightly to Blend
After the paint and clear coat cure completely (often 24–48 hours), use 3000-grit wet sandpaper to carefully level the area. Sand lightly and only enough to blend the repair into the original paint. Keep the area lubricated with soapy water.
Finish With Polishing & Wax
Use a polishing compound to remove sanding haze and restore shine. Buff until the repaired area matches the surrounding paint. Finish with a good wax or sealant to protect the repair and bring out a smooth, glossy look.
This method takes patience, but it’s the only way to properly restore deep scratches. When done right, the repair is nearly invisible and prevents rust from forming on exposed metal.
When to Let a Professional Handle It
Not every scratch is worth tackling at home. Some repairs require professional tools, paint-matching expertise, or a controlled environment to get the job done right. If the scratch is very deep, spans multiple panels, or exposes a large area of bare metal, a body shop is usually the safest choice. Deep scratches on metallic, pearl, or tri-coat paints are especially tricky because these finishes require precise layering to match the original color.
You should also let a pro handle it if you’re uncomfortable with wet sanding or if the clear coat is extremely thin. One wrong move can burn through the paint and turn a minor scratch into an expensive repaint.
If the car is newer or high-value, a professional repair preserves resale value. Body shops have paint scanners, high-speed polishers, and controlled lighting that ensure a flawless finish. Sometimes paying a little more upfront saves money in the long run.
Prevention Tips
Preventing scratches is always easier than fixing them. One of the biggest tips mechanics give is to avoid automatic car washes with rotating brushes—they’re fast, but those stiff bristles create thousands of tiny scratches over time. Instead, use hand washing or touchless washes whenever possible.
Applying a good coat of wax or a ceramic coating also helps protect your clear coat from small abrasions caused by dirt, road salt, and weather. Wax creates a slick barrier that lets debris slide off instead of grinding into the paint.
Use proper washing tools: microfiber mitts, soft towels, and separate buckets for washing and rinsing. Parking strategy also matters—avoid tight spots, bushes, low-hanging branches, and narrow garage entries where paint contact is likely.
If you want long-term protection, consider paint protection film (PPF) on high-impact areas like the hood, mirrors, and bumpers. It acts as a shield, absorbing minor scratches before they reach the paint.
A little prevention goes a long way in keeping your car looking new.
FAQs
1. Does toothpaste really remove car scratches?
Toothpaste can remove very light surface marks, but it’s not a professional or long-lasting solution. Toothpaste works like a super-mild abrasive, smoothing out tiny clear-coat imperfections. However, it doesn’t have the cutting power needed to make real scratches, and it can take a lot of rubbing to achieve small results. It also removes some of the clear coat, and using it too often can dull the finish. For consistent results, automotive scratch removers or polishing compounds are much safer and more effective than household toothpaste.
2. How do scratch removers actually work?
Scratch removers contain fine abrasives that gently level the clear coat around the scratch. When the high spots around the scratch are polished down, the scratch becomes less visible or disappears completely. They don’t “fill in” scratches; they remove a tiny layer of clear coat to blend the damaged area with the untouched paint. That’s why they work well on light, clear-coat scratches but not on deep ones that reach the paint layer. Used correctly with microfiber towels or a dual-action polisher, scratch removers can restore clarity and shine without harming the paint.
3. Can scratches come back after polishing?
If you remove a scratch correctly, it shouldn’t come back because polishing physically levels the clear coat. However, some scratches only appear to be removed when oils or fillers in the product temporarily hide them. After a few washes, the scratch can reappear. This happens more with cheap “quick fix” products. True abrasive-based compounds don’t hide scratches—they permanently remove the damaged layer. Just make sure to finish with wax or sealant, because a freshly polished surface without protection can get new scratches more easily.
4. How much does professional scratch repair cost?
The cost varies depending on scratch depth, location, and paint type. Light clear-coat scratches usually cost $75–$150 for a professional polish. Moderate scratches that need wet sanding often run $150–$300. Deep scratches requiring touch-up paint, blending, and clear coat can cost $300–$800 or more, especially on metallic or pearl finishes. Full panel repainting can go over $1,000. DIY methods save a lot of money, but if the scratch is deep or on a highly visible area, a professional finish may be worth the investment.
5. Can deep scratches cause rust?
Yes—if a scratch cuts through the clear coat and color layer and exposes bare metal, rust can form quickly. Moisture, salt, and oxygen react with exposed metal, initiating the corrosion process. Even small, deep scratches can lead to rust spots if left unchecked, especially in humid or coastal climates. Touch-up paint and clear coat seal the metal again and prevent oxidation. If rust has already started, it must be removed before painting; otherwise, it will continue to spread beneath the surface. That’s why deep scratches should be repaired sooner rather than later.
6. What’s the safest scratch remover for beginners?
For beginners, a mild scratch remover or a polishing compound specifically designed for clear-coat repairs is the safest option. Products like Meguiar’s ScratchX, Turtle Wax Scratch Repair, or 3M Scratch Remover are gentle enough not to damage paint if used properly. They work well by hand with microfiber applicator pads, making them ideal for DIY users who don’t have a polisher. Always start with the least aggressive product first—if it doesn’t improve the scratch, you can move up to stronger compounds or sanding methods.
Final Thoughts
Fixing car scratches isn’t as complicated as most people think. Once you understand how deep the scratch is, choosing the right repair method becomes easy. Light scratches usually disappear with a quality scratch remover, moderate scratches respond well to careful wet sanding and polishing, and deep scratches can be restored with touch-up paint and clear coat when you follow the steps patiently.
The key is taking your time and using the right tools so you don’t remove too much clear coat or make the damage worse. A little effort goes a long way toward keeping your car’s paint looking clean, smooth, and well-maintained. With regular washing, waxing, and smart preventive habits, you can avoid most scratches in the future.
